


Overview
An HTML Form is a group of one or more fields/widgets on a web page, which can be used to collect information from users for submission to a server. Forms are a flexible mechanism for collecting user input because there are suitable widgets for entering many different types of data, including text boxes, checkboxes, radio buttons, date pickers and so on. Django Forms are also a relatively secure way of sharing data with the server, as they allow us to send data in POST requests with cross-site request forgery protection.
Working with forms can be difficult. Developers need to write HTML for the form, validate the form properly sanitize entered data on the server (and possibly also in the browser), repost the form with error messages to inform users of any invalid fields, handle the data when it has successfully been submitted, and finally respond to the user in some way to indicate success. Django Forms take a lot of the work out of all these steps, by providing a framework that lets you define forms and their fields programmatically, and then use these objects to both generate the form HTML code and handle much of the validation and user interaction.
In this tutorial, I will be taking you through an introduction to Django forms.
HTML Form Overview:
The form is defined in HTML as a collection of elements inside <form>…</form> tags, containing at least one input element of type="submit" and as many as possible other input type.
    <!DOCTYPE html>
    <html>
    <body>

    <form>
    Author name:<br>
    <input type="text" name="author_name" id="author_id" value='JK Rowlings'>
    <br>
    Title:<br>
    <input type="text" name="title_id">
     Genre:<br>
        <select name='genre' id='genre_id'>
            <option value='adventure'> Adventure</option>
            <option value='adventure'> Romance</option>
            <option value='poetry'> Poetry</option>
        </select>
    <br><br>
    <input type="submit" value="Submit">
    </form>

    </body>
    </html>
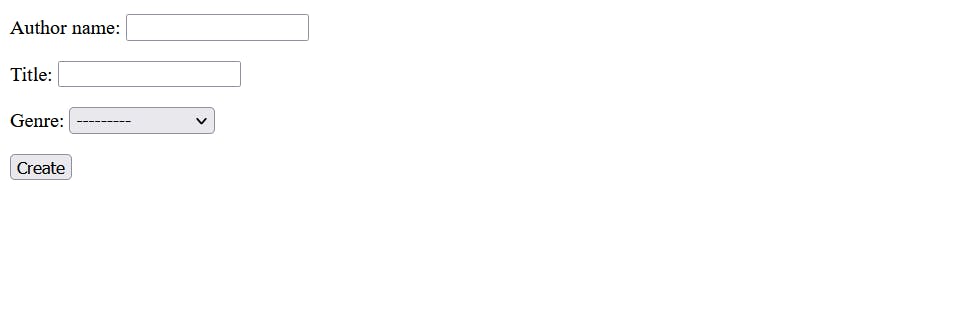 The field's type attribute defines what sort of widget will be displayed. The name and id of the field are used to identify the field in JavaScript/CSS/HTML, while value defines the initial value for the field when it is first displayed. The label is specified using the label tag (see "Author Name" above).
- action: The resource/URL where data is to be sent for processing when the form is submitted. If this is not set (or set to an empty string), then the form will be submitted back to the current page URL.
- method: The HTTP method used to send the data: post or get.
- The POST method should always be used if the data is going to result in a change to the server's database, because it can be made more resistant to cross-site forgery request attacks (Django has a built in solution for this).
- The GET method should only be used for forms that don't change user data (for example, a search form).
Common Input Element in HTML Forms:
- Text Field: The text field is a one line input field allowing the user to input text. Text Field input controls are created using the “input” element with a type attribute having value as “text”.
- Password Field: Password fields are a type of text field in which the text entered is masked using asterisk or dots for prevention of user identity from another person who is looking onto the screen. Password Field input controls are created using the “input” element with a type attribute having value as “password”.
- Radio Buttons: Radio Buttons are used to let the user select exactly one option from a list of predefined options. Radio Button input controls are created using the “input” element with a type attribute having value as “radio”.
- Checkboxes: Checkboxes are used to let the user select one or more options from a pre-defined set of options. Checkbox input controls are created using the “input” element with a type attribute having value as “checkbox”.
- File select: File select boxes are used to allow the user to select a local file and send it as an attachment to the web server.It is similar to a text box with a button which allows the user to browse for a file.Instead of browsing for the file, the path and the name of the file can also be written. File select boxes are created using the “input” element with a type attribute having value as “file”.
- Text area: Text Area is a multiple line text input control which allows user to provide a description or text in multiple lines. A Text Area input control is created using the “textarea” element.
- Select Boxes: Select boxes are used to allow users to select one or more than one option from a pull-down list of options. Select boxes are created using two elements which are “select” and “option”.List items are defined within the select element.
- Reset And Submit Buttons: The Submit Button allows the user to send the form data to the web server. The Reset Button is used to reset the form data and use the default values.
Django form handling process
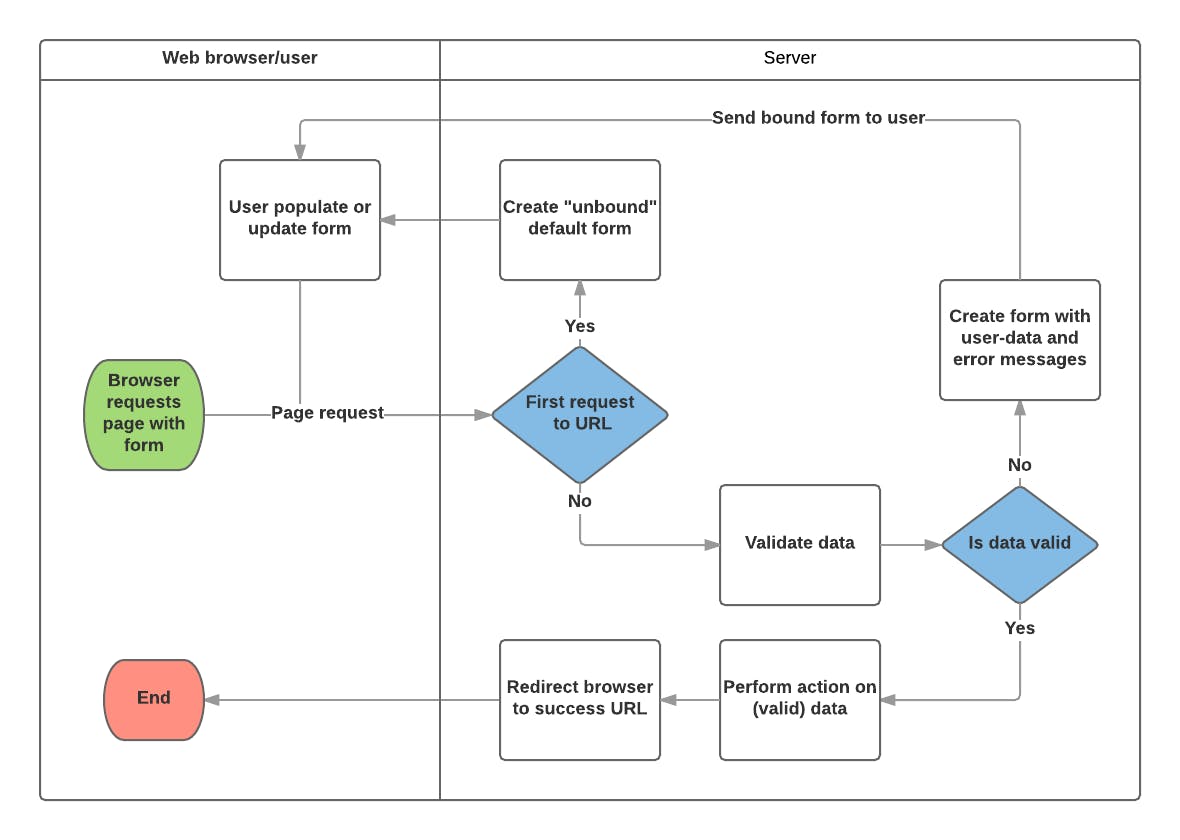
As you can imagine, creating the HTML, validating the returned data, re-displaying the entered data with error reports if needed, and performing the desired operation on valid data can all take quite a lot of effort to "get right". Django makes this a lot easier by taking away some of the heavy lifting and repetitive code! A process flowchart of how Django handles form requests is shown below, starting with a request for a page containing a form.
 the main things that Django's form handling does are:
- Display the default form the first time it is requested by the user.
- The form may contain blank fields if you're creating a new record, or it may be pre-populated with initial values (for example, if you are changing a record, or have useful default initial values).
- The form is referred to as unbound at this point, because it isn't associated with any user-entered data (though it may have initial values).
- Receive data from a submit request and bind it to the form.
- Binding data to the form means that the user-entered data and any errors are available when we need to redisplay the form.
- Clean and validate the data.
- Cleaning the data performs sanitization of the input fields, such as removing invalid characters that might be used to send malicious content to the server, and converts them into consistent Python types.
- Validation checks that the values are appropriate for the field (for example, that they are in the right date range, aren't too short or too long, etc.)
- If any data is invalid, re-display the form, this time with any user populated values and error messages for the problem fields.
- If all data is valid, perform required actions (such as save the data, send an email, return the result of a search, upload a file, and so on).
- Once all actions are complete, redirect the user to another page.
Django Form
The Form class is the heart of Django's form handling system. It specifies the fields in the form, their layout, display widgets, labels, initial values, valid values, and (once validated) the error messages associated with invalid fields. The class also provides methods for rendering itself in templates using predefined formats (tables, lists, etc.) or for getting the value of any element.
Declaring a Form
The declaration syntax for a Form is very similar to that for declaring a Model, and shares the same field types. This makes sense because in both cases we need to ensure that each field handles the right types of data, is constrained to valid data, and has a description for display/documentation.
Form data is stored in an application's forms.py file, inside the application directory. Create and open the file forms.py in your django project. To create a Form, we import the forms library, derive from the Form class, and declare the form's fields. A very basic form class for our library book renewal form is shown below — add this to your new file:
from django import forms

class BookForm(forms.Form):
    author_name = forms.CharField(label='Enter Author's Name',
                                  help_text='Enter the Name of the Author',
                                  max_length=120)
Form fields
In the case above, we have a single CharField (which accepts only Characters just like django models CharField) for entering the author name that will render in HTML with a blank value, the default label "Author Name", and some helpful usage text: "Enter the Name of the Author.". This will be rendered using the TextInput widget.
There are many other types of form fields, which you will largely recognize from their similarity to the equivalent model field classes:
- BooleanField
- CharField
- ChoiceField
- TypedChoiceField
- DateField
- DateTimeField
- DecimalField
- DurationField
- EmailField
- FileField
- FilePathField
- FloatField
- ImageField
- IntegerField
- GenericIPAddressField
- MultipleChoiceField
- TypedMultipleChoiceField
- NullBooleanField
- RegexField
- SlugField
- TimeField
- URLField
- UUIDField
- ComboField
- MultiValueField
- SplitDateTimeField
- ModelMultipleChoiceField
- ModelChoiceField
The arguments that are common to most fields are listed below:
- required: If True, the field may not be left blank or given a None value. Fields are required by default, so you would set required=False to allow blank values in the form. -label: The label to use when rendering the field in HTML. If a label is not specified, Django will create one from the field name by capitalizing the first letter and replacing underscores with spaces (e.g. Author Name).
- label_suffix: By default, a colon is displayed after the label (e.g. Author Name:). This argument allows you to specify a different suffix containing other character(s).
- initial: The initial value for the field when the form is displayed.
- widget: The display widget to use.
- help_text (as seen in the example above): Additional text that can be displayed in forms to explain how to use the field.
- error_messages: A list of error messages for the field. You can override these with your own messages if needed.
- validators: A list of functions that will be called on the field when it is validated.
- localize: Enables the localization of form data input.
- disabled: The field is displayed but its value cannot be edited if this is True. The default is False.
Validation
Django provides numerous places where you can validate your data. The easiest way to validate a single field is to override the method clean_() for the field you want to check. So for example, we can validate that entered author_name values is not empty and does not contain only digits by defining clean_author_name() as shown below.
class BookCreationForm(forms.Form):
    author_name = forms.CharField(max_length=12)

    def clean_author_name(self):
        author_name = self.cleaned_data.get('author_name')
        if not author_name:
            raise forms.ValidationError('You do not provide an Author Name')
        if author_name.isnumeric():
            raise forms.ValidationError('Using only Digits as a name is not allowed')
        return author_name
There are two important things to note.
- The first is that we get our data using self.cleaned_data.get('author_name') and that will return this data whether or not we change it at the end of the function. This step gets us the data "cleaned" and sanitized of potentially unsafe input using the default validators, and converted into the correct standard type for the data (in this case a String object).
- The second point is that if no value was entered or only digits was entered, a corresponding Validation error will be raised.
Thank you for Reading. In the next part of this article, we are going to be discussing Form Handling in Django views.
Don't forget to connect with me on LinkedIn Here. I will see you in the next part..